
Bank feeds let Law App pull transactions directly from your bank, so you’re not manually importing statements. The connection is handled through Fiskil, a secure open banking provider. Once connected, transactions sync automatically every hour.
Some banks require you to complete a form and have an authorised signatory approve the connection before you can proceed. Don’t leave this until the week you go live — start the process as early as possible to avoid delays.
Before you start
Check that you have the following ready before beginning:
- Access to your firm’s online business banking — you’ll need to log in during the connection process. Personal banking credentials won’t work for a business account.
- The email address registered to your business bank account.
- Your bank may require an authorised signatory to approve the connection. If you’re not sure, check with your bank before starting.
Fiskil supports most major Australian banks but coverage varies. If you run into connection issues with your bank, check the Fiskil website directly for supported institutions and any current outages or bank-specific status updates.
Connect your bank
Navigate to Settings in the bottom-left menu, then select Banking Setup, then Bank Sync.
Click Configure Fiskil. This opens the Fiskil authorisation flow in your browser. From here:
- Click Continue to authorise the connection.
- Select your bank from the institution list.
- Enter the email address registered to your business banking account and request a verification code.
- Enter the code when it arrives.
- Select which accounts you want to sync — you can select multiple.
- Click Confirm and share to complete the authorisation.
Once confirmed, you’ll be returned to Law App automatically. Click Check Fiskil Status — this verifies that the authorisation has registered correctly. Your status should show as Connected before you proceed. If it doesn’t, wait a moment and try again.
Map your accounts and set the sync date
Once connected, the Bank Sync screen shows each of your Law App bank accounts. Each account needs to be mapped to the corresponding Fiskil account and given a sync start date before it will begin importing transactions.
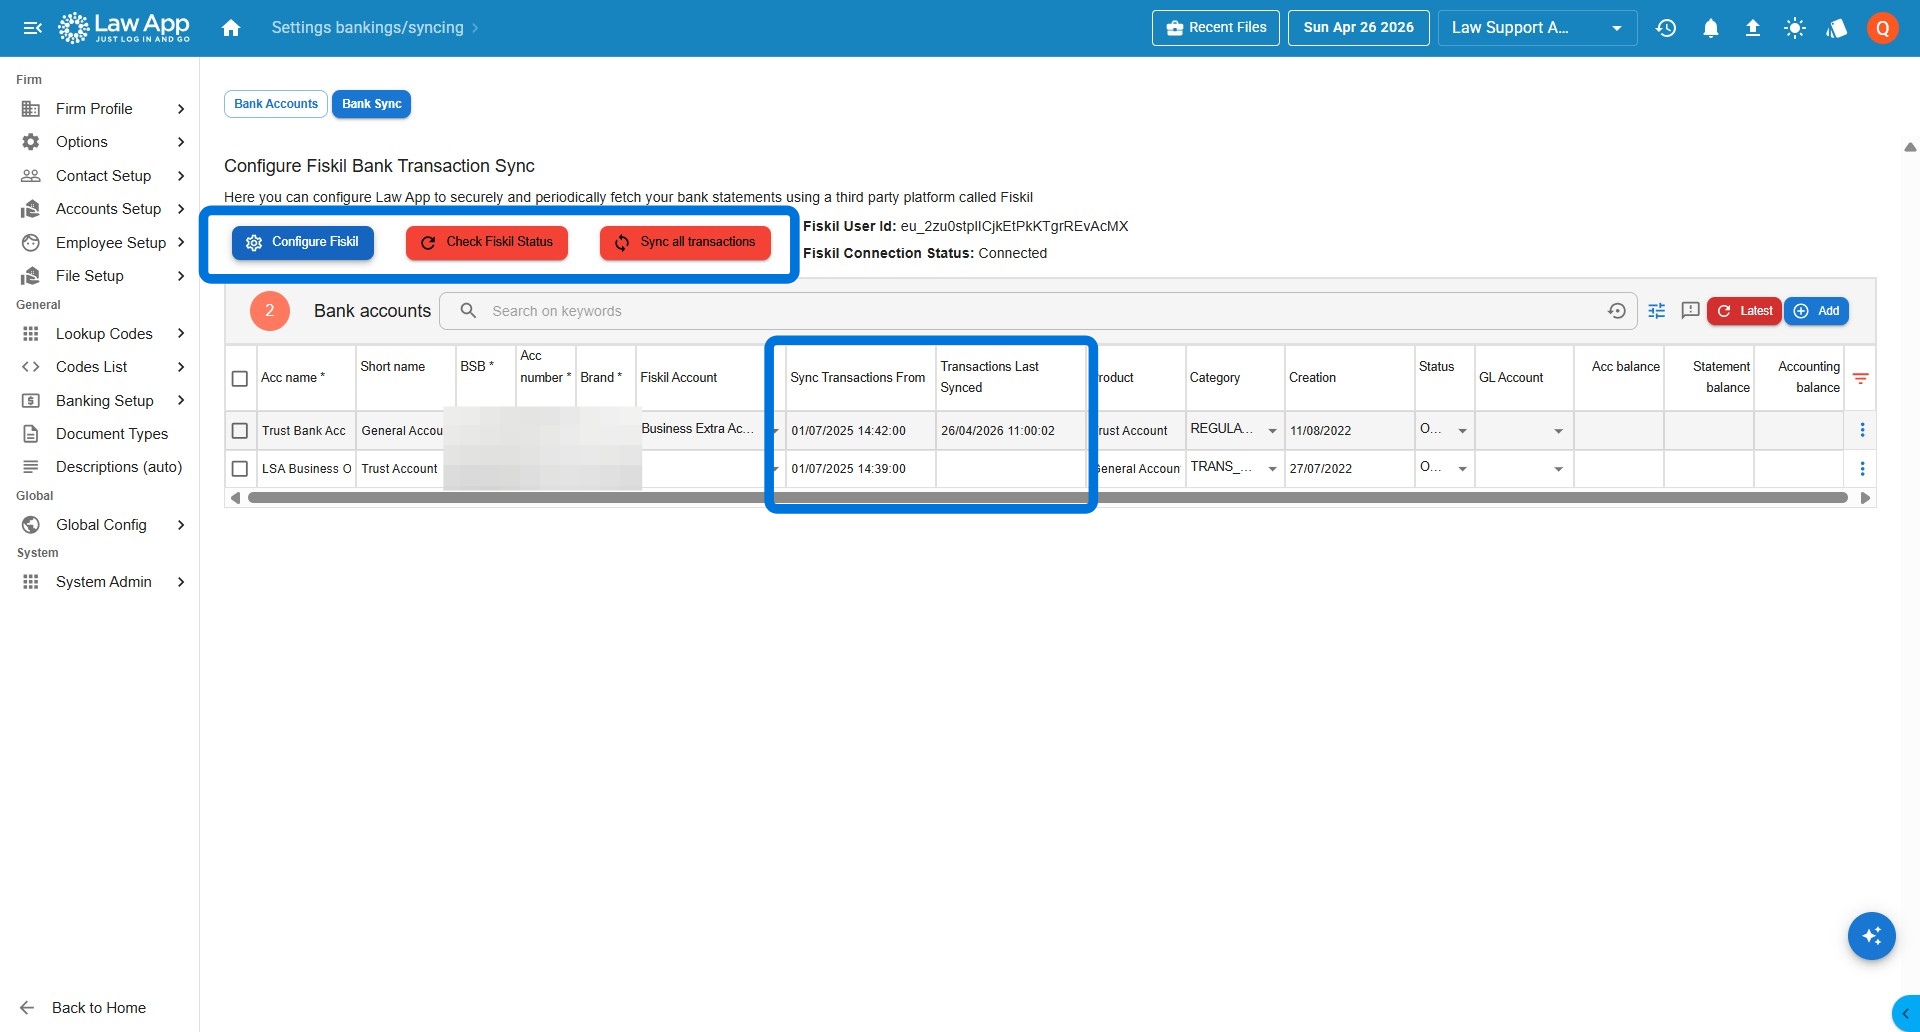
The screenshot above shows what this looks like in practice. The general account (first row) has been fully mapped and configured — you can see the bank account name, the sync date, and that it is actively syncing. The trust account (second row) has not yet been mapped — it shows no bank details and no sync date. Each account needs to be configured separately before it will sync.
For each account:
- Select the matching Fiskil bank account from the dropdown next to each Law App account.
- Set the Sync Transactions From date — this controls how far back Law App will retrieve transactions.
- Click Save all when all accounts are configured.
Set this date to match your go-live date or the date of your last manual statement import. Setting it too far back will pull in transactions you’ve already processed and create duplicates. If you’ve manually uploaded any bank items, make sure your sync date is set after those items so the same transaction doesn’t come in twice when the bank feed catches up.
Run your first sync
Click Sync all transactions. Law App will retrieve all transactions for each account from your chosen start date. A confirmation message will tell you how many transactions were found and imported.
From this point, Law App syncs automatically every hour. You don’t need to do anything to keep it running.
You’ll need to re-authenticate with Fiskil once a year to maintain the connection. Law App will prompt you when this is due — the process is the same as the initial setup and only takes a few minutes.
Syncing and resyncing
The Sync all transactions button is useful any time you want to push a sync immediately rather than waiting for the automatic hourly run. There are also individual Sync buttons per account if you only need to refresh one account.
Each sync retrieves transactions from the Sync Transactions From date forward — it won’t go back further than that date, which is why setting it correctly matters.
Banks occasionally slot transactions in with a backdated value date, which means a transaction can be missed by the sync that ran at the time. This is a banking behaviour, not a Law App issue. If you notice a missing transaction, go to the Bank Sync screen and move the Sync Transactions From date back to before the missing transaction, then click Sync all transactions to rerun over those dates. Once the missing transaction has come in, set the sync date back to where it was to avoid pulling in duplicates on future syncs. If transactions still can’t be recovered through a resync, see Missing bank feed transactions for further troubleshooting steps.
Verify your imported transactions
To check what came in, go to Banking in the main menu and select Bank Transactions. You’ll see each account listed with the transactions imported from your sync date.
If transactions still aren’t appearing after a resync, see Missing bank feed transactions for further troubleshooting steps.
For questions about what to do next with imported transactions, see What happens if my trust ledger doesn’t match the bank account.
Need help getting connected? Contact us at support@lawsupport.com.au or call 07 3040 3036.
Leave a Reply